


Popups are a powerful tool for engaging with visitors and driving meaningful actions on your WordPress website. For instance, you might want to create a WordPress popup to grow your email list, promote exclusive discounts, or share important announcements. In fact, these small yet impactful elements can make a big difference when used strategically.
Fortunately, with the Hustle plugin, designing a WordPress popup is simple, customizable, and completely free. In this tutorial, I’ll guide you step-by-step through the process of creating an engaging popup on your WordPress site, all without spending a dime.
Despite their small size, popups are powerful. They have the ability to grab attention, provide immediate value, and inspire consumers to take action. The most outstanding aspect? You can create them without spending a fortune on tools. In just a few simple steps, you can create beautiful and useful WordPress Popup with free solutions!

In this tutorial, I’ll guide you through the step-by-step process of setting up an effective popup on your WordPress website using the Hustle plugin. Whether you’re a beginner or an experienced user, you’ll learn how to make the most of this powerful tool without spending a penny.
Why Use a WordPress Popup?
- Encourage visitors to subscribe to your newsletter Capture leads.
- Advertise great deals like deals or discounts.
- Important announcements should be shown to your visitors.
- Drive traffic to specific web pages.
Popups can greatly increase user engagement and conversion rates when used correctly.
Step 1: Install a Free WordPress Popup Plugin
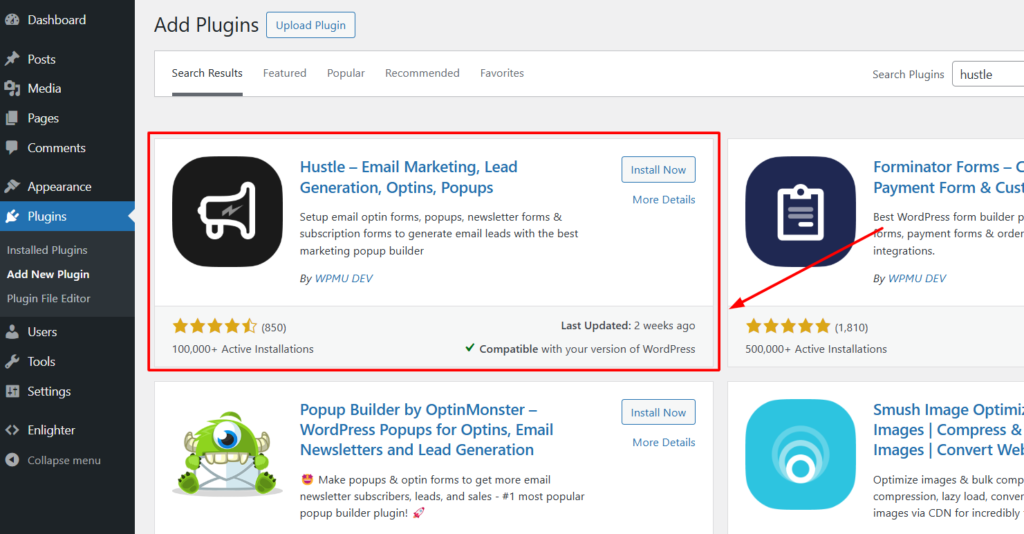
To create a WordPress popup, you first need to have a trusted plugin. There are plenty of free solutions in the WordPress plugin library. Follow these steps:
- Access your WordPress dashboard.
- Go to Plugins and clickk on “Add New” from there.
- Type the word “Hustle” into the search bar.
- Find the Hustle plugin by WPMU DEV, then click Install Now and Activate it.
- The plugin menu will appear in your WordPress dashboard once it’s installed.
Step 2: Access the Hustle Dashboard
After activation, locate the Hustle menu in your WordPress sidebar. Click on it to open the dashboard. Here, you’ll find various tools for creating and managing popups, slide-ins, and embeds.
Step 3: Create Your First WordPress Popup
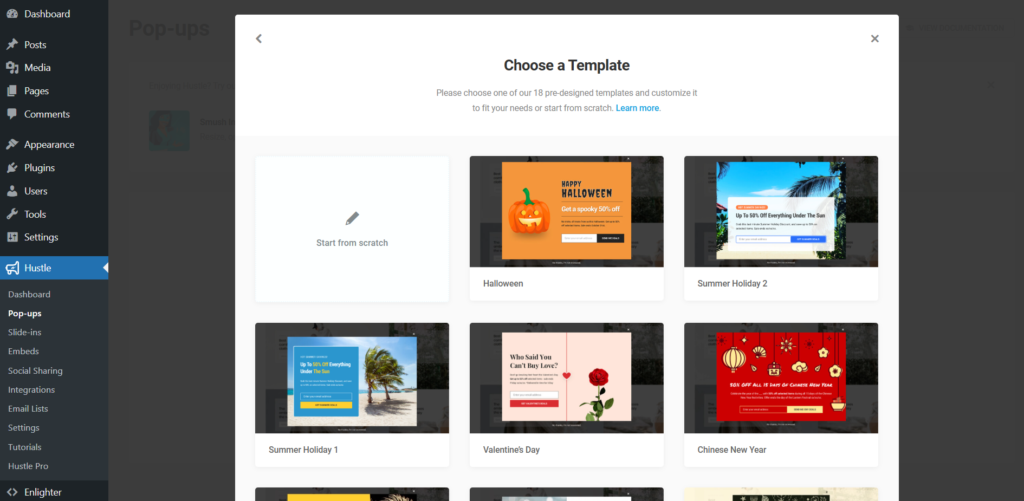
Now, let’s get started with creating your first popup:
- In the Hustle dashboard, click Popups > Create New.
- Name your popup, e.g., “Newsletter Signup” or “Welcome Offer”.
- Click Create to proceed to the customization screen.
- Here you can choose from various pre-built pop ups or create from scratch.
Step 4: Customize Your Popup
This is where the magic happens! Hustle allows you to design a popup that fits your needs and brand identity. Here’s how:
- Content: Add a catchy title, clear message, and a strong call-to-action (CTA). For example, “Sign Up for 20% Off Your First Order!”
- Design: Choose a background color, upload an image, or select a font style that complements your website.
- Forms: Add input fields for email addresses or other information you want to collect.
For this tutorial, let’s create a simple email subscription popup with a title, description, and email input field.
Step 5: Set Popup Triggers and Conditions
When and where your WordPress popup will appear is determined by the trigger. Haste offers several options, such as:
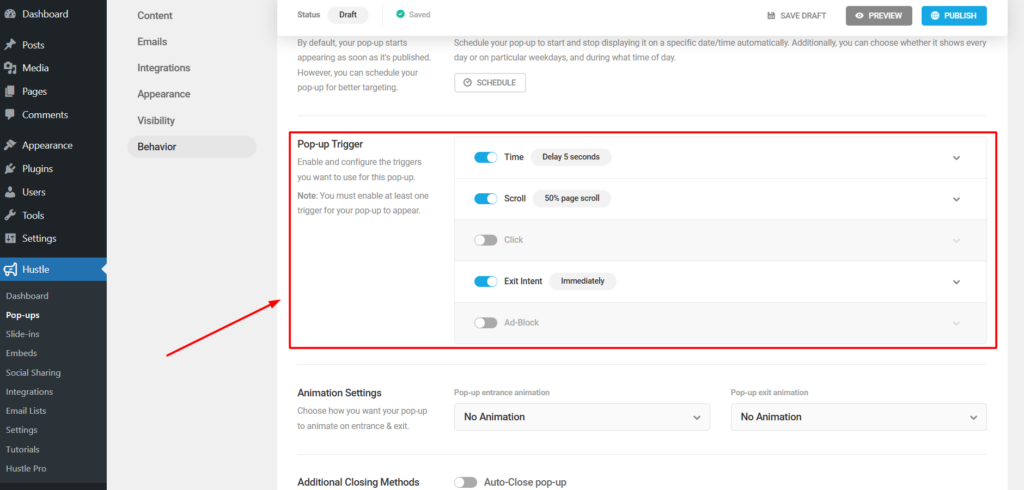
- Time Delay: Show the popup after a visitor has been on your page for a few seconds.
- Scroll Percentage: When a user scrolls halfway down the page, the popup will appear.
- Exit Intent: Show the popup when a visitor is ready to leave your website.
You can specify which sites, posts, or devices the popup should appear on under Viewability Rules.
Step 6: Publish Your Popup
Once you’re happy with the design and settings:
- Click Publish in the Hustle dashboard.
- Visit your site to preview how it looks live.
Test the popup on different devices to ensure it’s responsive and functional.
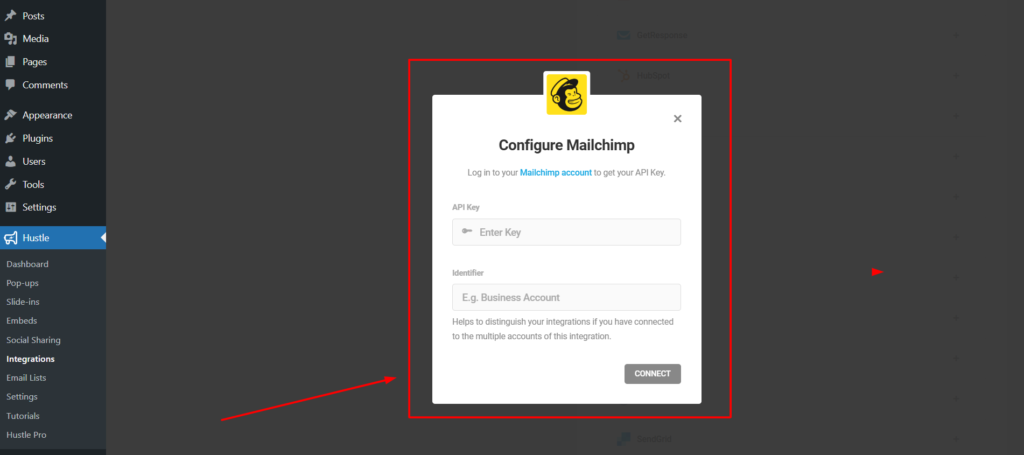
Step 7: (Optional) Connect Email Integration
You may combine Hustle with well-known email marketing platforms like Mailchimp, Constant Contact, or Sendinblue if you’re gathering email addresses.
To set this up:
- Go to the Integrations tab in the Hustle dashboard.
- Select your preferred email service.
- Follow the on-screen instructions to connect your account.
Now, every email collected through the popup will automatically sync with your email marketing platform.
Tips for Creating Effective WordPress Popups
- Be concise and clear: To successfully get your point across, use simple language.
- Consider the user experience: Set appropriate triggers and frequencies to prevent intrusive popups.
- Design A/B testing: Try different headlines, colors, and calls to action to determine what works best.
- Track performance: Track impressions, clicks, and conversions with Hustle Insights.
Conclusion
Creating a free WordPress popup is now easier than ever using the Hustle plugin. You can create stunning, engaging popups that captivate your audience and increase conversions by following these step-by-step instructions.
Ready to take your website to the next level? Start experimenting with popups today by installing the Hustle plugin! Remember to subscribe for more WordPress tips and tricks, and share this tutorial with other website owners if you found it useful.


Nice post!
Thanks.